Thursday, June 30, 2011
Thursday, June 9, 2011
HERE ARE SOME EXTRA PICTURES-I HOPE THESE HELP!!!
Please email me if you have any questions at NEION21@aol.com write in SUBJECT tutorial -thanks
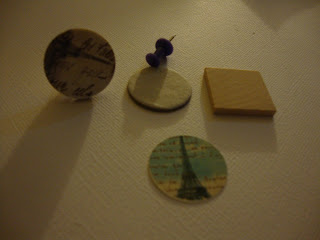
I am also considering doing a live video -the top photo is what your bottle cap should look like when you apply your demensional glue, make sure you glue your image down first and let completely dry-- most important at this stage is BUBBLES!!! do not shake your dementional glue and take a toothpick to pop or flick out your bubbles or after it dries it will NOT look good-2nd from top- is a example of GRUNGE-making your caps look old and vintage , I used a hammer, yes girls a hammer and some Tim Holtz paper and you have your vintage bottle caps 3rd Pic from top- I made with the help of Tim Holtz fragments , I needed an old looking necklace for my altered art box, so I used my graphic images-4th picture from top-Is just an example of embellishments i made for a project all with inchie graphics and of course not the old vintage phots, those are also from Tim Holtz paper line-5th pic from top- my personalized push pins also made from inchie art -- I hope I have helped you with your adventure with inchie graphics -
I am also considering doing a live video -the top photo is what your bottle cap should look like when you apply your demensional glue, make sure you glue your image down first and let completely dry-- most important at this stage is BUBBLES!!! do not shake your dementional glue and take a toothpick to pop or flick out your bubbles or after it dries it will NOT look good-2nd from top- is a example of GRUNGE-making your caps look old and vintage , I used a hammer, yes girls a hammer and some Tim Holtz paper and you have your vintage bottle caps 3rd Pic from top- I made with the help of Tim Holtz fragments , I needed an old looking necklace for my altered art box, so I used my graphic images-4th picture from top-Is just an example of embellishments i made for a project all with inchie graphics and of course not the old vintage phots, those are also from Tim Holtz paper line-5th pic from top- my personalized push pins also made from inchie art -- I hope I have helped you with your adventure with inchie graphics -
Wednesday, June 8, 2011
STEP SEVEN IN TUTORIAL -These are just some more Uses when using these graphics.......
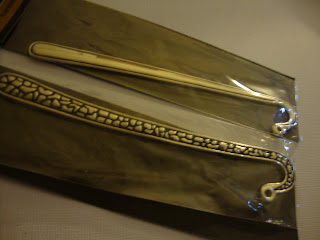
Book Marks- Bows- Scrapbooking Embellishments- neclaces-Jacket pulls-flipflops-paper clips -magnets- personalized pushpins - and im sure there are a million more-- Thanks for following my tutorial I hope it helped ...
STEP SIX IN TUTORIAL MAGNETS MAGNETS AND MORE MAGNETS
You can find magnets in all shapes and sizes, these are in rolls at different widths and then theres the square which comes in different thickness depending on your needs as well the circle magnets they also come in different sizes and thickness- the thick tall magnet in the bottle cap is perfect for bottle cap magnets and bows

STEP FIVE-- IN TUTORIAL
Ok, once you have your graphic punched and your medium your adhereing it to--- you would use the same products your going to seal with to actual glue the graphic on to your medium-then depending on your project (example if your making a pendant) you would take your E6000 glue and glue your "finding" to the back of your necklace pendant-- FINDING is used in jewelry making to describe various items, in this instant Im referring to the actual silver piece that you put your cord or whatever your stringing your necklace with . Also here is some various suggestions you can use to string your pendant- leather cord-ball chain-ribbon necklace (which you can buy or make yourself) the one pictured was bought I think its cheaper to buy them then to make them (THEY ARE VERY CHEAP) or softflex wire, which the one pictured is from HOBBY LOBBY and was very exspensive since it is .925 sterling silver all purpose flex wire
STEP FOUR SEALING-- your project or using a glass blank which will really make your graphic POP
In this next step you have various different products to seal your chipboard, wood, bottlecaps, plastic , or glass blanks or other various mediums -- Also included a close up of a inchie square glass blank
Diamond Glaze from Judakins- Glossy Accents from Ranger- Dimentional Glue from Mod Ponge- Epoxy circles from The paper studio and E6000 Craft glue (which is not for sealing) E6000 is for attaching your finding on back of project if making jewelry--( glass blanks come in various sizes)
OK SEALING-- USING GLASS BLANK- take one of those products I showed you in previous picture and squeeze out little more then a dime size on your graphic side, then take your blank and put real pressure down on it, if your putting enought pressure you will see the adhesive flatened out all over your graphic-let dry then cut anything hanging over your glass blank ,then you want to apply modge pod over and over the back, many layers letting each dry and then sandpaper around the edges making all the layers of modge pod smooth and not even noticeable next step is attaching the "finding" silver pendant to the back with E6000 glue
Sealing chipboard or wood - put your adhesive on back of graphic and adhere to medium flip over and useing your deminsional glue of your choice (without shaking it) squeeze a thick layer over your image and let stand for 24 hours (any bubbles pop with a toothpick) your demensional glue should be a thick clear layer on top of your graphic
SEALING BOTTLE CAPS- after glueing your graphin on outside of bottle cap you can use a epoxy circle or use your demensional glue just as you did for step above and let dry - then glue your magnet or finding with E6000 glue- This goes for using your graphic on the inside of your bottle cap as well
STEP THREE INCHIE TUTORIAL- this tutorial is the same for all graphics inchie, microscope slide, dominoes, circles or scrabble tiles
Next step is to decide what your making and how to seal it, this step also goes for whatever may be using as your medium- Bottlecaps, chipboard, plastic, wood blanks or upcycle and use scrabble tiles, you can find all these in circles or square inchies- you can also by-pass all these and just use glass (next pic)
STEP TWO INCHIE-DOMINOE-MICROSCOPE-BOTTLECAP GRAPHIC TUTORIAL
Ok, after printing you need to punch your graphics out - the best way to do this is cut a row of your graphics out this makes it easier for you to punch. Take your punch turn it upside down-this makes it soo easy to see exactly where your punch will make the punch -NOW remember this is the same for inchie circles or inchie scrabble tiles-
STEP ONE Since inchie graphics are new to paper piecers i thought id share a TUTORIAL on the subject, ive been doing inchie graphics, dominoe,microscope graphics way before I ever did Paper Piecing
The first step is to pick your graphics then print out, ive read where people are saying to print out on paper which you can I guess but photo paper is really what you want to print your graphics on .It gives you a crisp beautiful image-glossy or matte is you choice, you want ur printer/computer set on 300DPI-
Tuesday, June 7, 2011
Monday, June 6, 2011
Sunday, June 5, 2011
Thursday, June 2, 2011
Subscribe to:
Comments (Atom)


